Thursday, March 1, 2012

Anitque Mirror

Yup!  Been falling down on my blogging again.  Actually, I've been falling down on a lot of things lately.  Seem to be in one of those "slumps" where I kinda walk around in circles, scratching my head and don't know exactly where to start.  But, I think I'm finding my mojo again.  Spent my day sanding two pieces of furniture.  I don't know.....  everything has to be right for me.  Ya' know, all the stars have to be aligned, the weather has to be just perfect.  I guess I'm a high maintenance furniture refinsher.  That's gotta stop!  Time to get SERIOUS! 

I picked up this mirror quite a while back.  It was an immediate emotional love affair.  There was just something about it that mesmerized me. 


It's been in the pile with all of my other "projects" for several months but it was always in the back of my mind.  Finally, last weekend I dug it out.  That was not an easy task but I came out alive!  It took an act of congress to get this baby out with no damage.  Nothing fell on me and nothing got broken so the junk Gods were shining on me once again!

She had so many missing pieces that had broken over the years.  I laid her out and began the task of disassembling her, the whole time holding my breath. 


I threatened to kill Pig Pen if he came anywhere close to the table while I was trying to remove the mirrors.  So far, so good. 


It was time to perform some much needed plastic surgery on this poor girl.  The wood was literally disintegrating!  I was afraid to breath on it!  I used the utility knife to cut off the pieces from one side that were missing from the other.  Then, I used this Welder glue (which is my MIRACLE GLUE) to secure all the pieces that were flapping in the wind.  I came to REALLY appreciate her at this point.  Wish I could use Welder to fix my flapping parts.  Ya' think I could fold up the skin under my arms and use this to glue it to my armpits?  Hmmmm....  food for thought! 

Next up...  a little wood putty to fill in her missing pieces.  Wishing I were made of wood right now.  This could do WONDERS for crow's feet! 


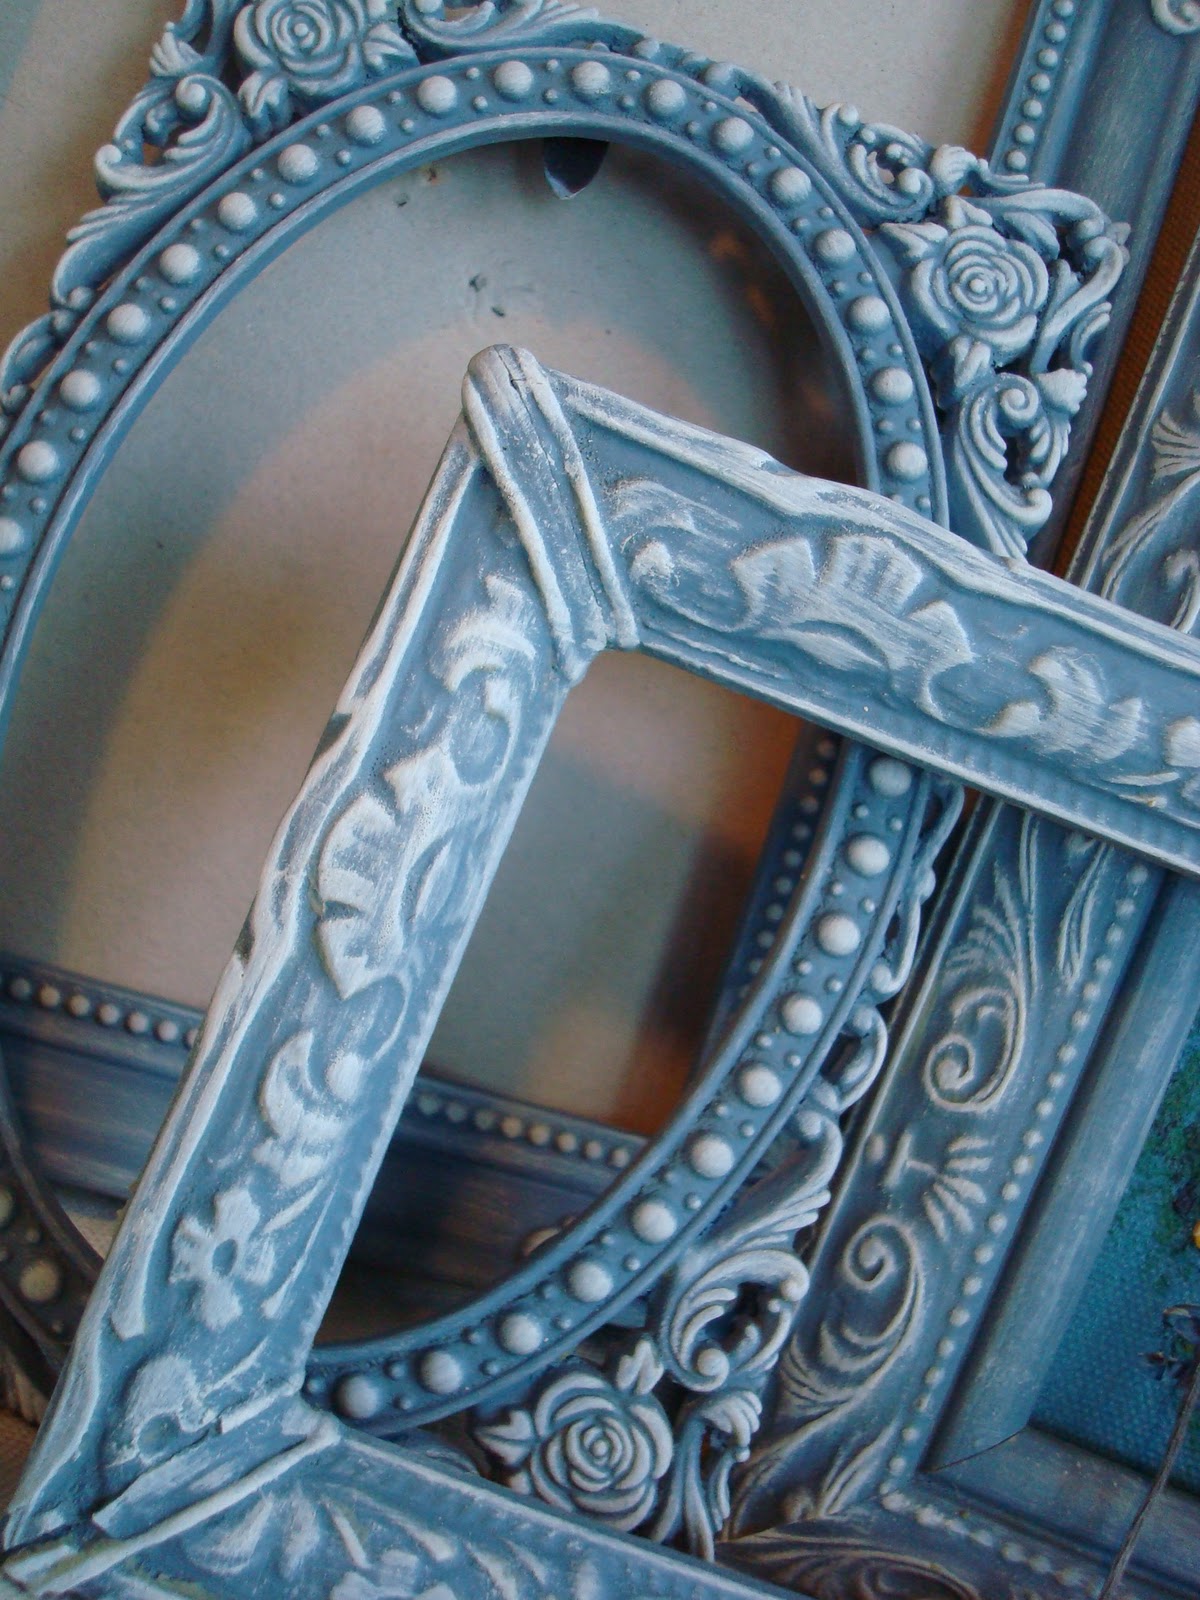
After the putty dried, I carefully sanded it to a smooth surface.  Then I mixed up some homemade white chalk paint and started painting.  After a couple of coats of paint, I mixed up a brown glaze and applied to make all the details stand out. 


I went back and forth....  to distress or not to distress.  I decided not to.  I was happy with her look as is! 


I thought the glaze "antiqued" her enough and brought out the details.  I didn't want to "over do" her. 


I get all giddy when I find a date stamped on an old piece!!!!  I was beside myself when I saw this stamped on the back of one of the mirrors.  Actually, it was stamped on all three but only this one was legible.  No wonder this poor girl was so brittle and her mirror so worn.  Love her even more now that I know her birthday!!! 


I'm more in love now than ever!!!!  Hulk made some comment tonight about selling her.  I didn't have the guts to tell him that I don't think I can part with her.  Think I'll just "hide" her away for a little bit and then while he's at work one day, I'll hang her in the spot I have reserved.  There's so much stuff around here, I doubt he'll notice????  She's mine!!!!  I rescued her from behind a bunch of old broken down TVs in a shack of a building.  We're "connected"!  She deserves better than to be "sold" like a cheap...... 

Until next time!!!!  Whenever that might be.  I want to be a good blogger.  Really, I do.  I know!  You're thinking, "yeah, we've heard that one before".  BUT, I'm really going to get it together. 

Love to you all!!!!! 

Monday, February 20, 2012

The month of Luuuv & the color red~ Kim from Vintage Paints

In the spirit of Valentine's Day and February, the month of Luuuuuuuv, I asked my painting soul mate Kim, of Vintage Paints, to come over and share her flare with the color red.  This girl has more talent in her pinky toe than I have in my whole body!  And what she does with the color red on furniture is amazing!  It take kahunas to paint with red but she does it so well!  Grab a cup of coffee, a glass of tea, a beer, wine, Mt. Dew (whatever your vice may be) and sit back and be inspired!  This lady inspires me every day!   If you haven't met Kim or seen her work, well you're in for a huge treat!  Take it Kim! 

Hello there!  It’s Kim, from Vintage Paints.  I am so honored to be a guest
blogger for Sissy’s Salvation today!  We are going to talk about the color red
and my obsession with red furniture. 
From Color Psychology:  The most emotionally intense color, red stimulates a
faster heartbeat and breathing. 
Does the color red do this to you?  It certainly does to me!  It evokes many
emotions; excitement, happiness, pleasure.  I think it’s the deep dark red that
really inspires me.  I’ve tried several reds over the past year---some I’ve
liked, some I haven’t but through all of these trials & tribulations, I have
found the one.  You know, my love/soulmate/makes my heart skip a beat.  It is
Benjamin Moore’s “Million Dollar Red.” 


Isn’t that color gorgeous? I love paint and I love to pick out new paint colors. 
I was standing in Benjamin Moore one day, with a fistful of paint chips and on a
whim, I decided I wanted a red and chose this one.  Now, it does go on a bit
strong and you might be thinking “what is Vintage Paints talking about, this
color is bright red”…you must stay with me here.  Don’t fall off the deep end
like I did when I first brushed this color on my piece of furniture.  It was so
bright and really not at all what I had envisioned.  If you prime your furniture
first with a gray, the red will show better. I use this: 


Be patient, red takes a few coats to get that fabulous deep red.  The first coat
will have an orange/red tint to it.  Let it dry thoroughly before you apply
additional coats, each layer will deepen the color.  Now to truly get the deep
finish that I love, you need to do a dark glaze once your paint is nice and dry. 
I prefer black to anything else on red furniture.   You can buy glazes pre-mixed
or whip up your own.  I prefer to make my own.

Glaze
 Glazing Medium (found at Michaels/Hobby Lobby)
 Black latex paint (the richer the color the better)
 Water
 Foam brush and soft towel (I cut up old t-shirts)

I like my glaze to be pretty thick so it gets in all of those nooks and
crannies.  I make sure my towel is pretty damp; not dripping wet but definitely
wet.  Brush on the glaze and wipe off with the towel.  You’re in total control
of how much and where that glaze goes.  The wet towel really helps you remove
excess glaze and keeps the product moist, which extends your work time.  Leave
it in the areas you want to accent.  It really helps bring those details out and
make them more visible.  Wipe off too much?  That’s okay, just give it a few
seconds to dry up and reapply.  The black gives you that gorgeous farmhousey red
that we all love! 
Here are some pieces I’ve done with Million Dollar Red and black glaze: 


Farmhouse Red Hutch


Farmhouse Red Bistro Set


Farmhouse Red Cabinet


Farmhouse Red Dresser

I hope this makes red a little less intimidating!  Embrace color, it’s good for
your soul.  *and if you don’t like it, you can paint over it* :)

Thank you so very much to my girl Tracy, for having me here!  You inspire me
daily with your kind soul, lovely ideas and fabulous work!  I am so fortunate to
be able to call you my friend.  Love ya’, girly!

Vintage Paints has left the building…

Kim is one of those rare people you meet in life!  Such a sweetheart!  When I was on my knees praying for comfort, after my father crossed over to Heaven, Kim was there waiting and comforting me.  I will always be grateful for her presence in my life.  She's one of the truly special people in this World and I thank God for putting her in my path!

You can visit Kim's blog here:
http://vintagepaintsblog.blogspot.com/

And her Facebook page here: 
http://www.facebook.com/#!/pages/Vintage-Paints/198118963548226

Wednesday, February 15, 2012

Guest Blog at Vintage Paints!!!!!!

My painting soul sister, Kim at Vintage Paints, was sweet enough to invite me over as a guest on her blog!!!!  Talk about flattered!  Kim is a wizard with paint so when she asked me to be her guest, I was SO stinkin' excited! 
If you have not yet visited the Vintage Paints blog, you are in for a real treat!!!! 

http://vintagepaintsblog.blogspot.com/2012/02/guest-blogger-sissys-salvation.html


Wednesday, February 1, 2012

The BEAST! ~ repurposed sewing machine table

Will I ever learn to stop under estimating the complexity of things?  I have all these wonderful ideas running around in my head.  Unfortunately, I do not have all the skills to go with them!  I had three sewing machine tables that I picked up here and there.  My mom was wanting a new side table to go between her two new chairs.  Of course, I chime in that I can re-purpose one of these tables for her, NOOOOO problem.  Hmph!!  Famous last words. 

This is the one she chose.
That's not a rat wearing a shirt.  That's my Yorkie dog, Duncan.  He has issues like is momma.  :-)

This table had a little more detail than the others and nice curvy legs.  First up was to cut 4" off the legs to get the proper height for a side table.  NOOOOOO problem!  Hmph!  I get out my tape measure and Skill Saw and proceed to hack the living Hell out of these legs.  You know not even two of them were the same length.  Who would have thunk??  I was so disgusted.  Hulk came home from his fishing trip and found me sitting on the back deck with head in hands.  "What's wrong, Babe?"...  My reply, "I've $%#$#%%%^$$$....  stupid @#&^%$^%!  I'm so @#&^%^%$."  Then he proceeds to tell me how I should have done it and that I used the wrong type saw, blah, blah, blah.  Thanks Bob Villa!  Where were you 30 minutes ago??  So, I just swallowed my pride and asked him to fix them.  He did. 

On to step two.  Build a shelf where the sewing machine used to live for storing magazines, books, etc.  NOOOOO problem!  Hmph!  I make myself a paper template of the inside.  So far so good.  I transfer that to my plywood and move outside to cut it out.  Besides my complete terror of the saw, that went pretty well.  I screw the 4" pieces that I cut off the legs to each side of the table as braces for the shelf.  I measure, use my little level, attach them.  At this point, I'm thinking, "easy peasy...  I got this."  Time to put the shelf in.  Didn't dawn on me that I would now not be able to get the thing in there because now there are 4 blocks of wood preventing me from angling it in there now.  Once again, head in hands that eventually slide up to grab the hair and starting pulling!  I take the shelf back out and cut it into two pieces.  Take THAT!  Finally get the demolished shelf secured in the table.  Problem now?  FUGLY with a capital F.  It looked like a complete train wreck.  How am I going to fix THIS???  Wheels start spinning....  gotta cover up the ugly.  So, I bust out some fabric and Modge Podge.  I won't go into how frustrating this step was because this post is getting way too long. 


This is what I ended up with.  Perfect?  Far from it!  Functional?  Yes.  A for effort, right?  Just OVER THE MOON happy to be done with it! 


I mixed up some chalk paint with a pale yellow oops can I picked up at Lowes.  Wasn't sure what to do with the pull.  It was so pretty and I wasn't sure I wanted to paint it.  So, I soaked it in apple cider vinegar for a few hours and scrubbed it with an old tooth brush and it came back to it's shiny original finish. 


The little tray that used to hold spools of thread is now a little shelf to hold TV remotes.  I just snipped off the "spikey thingies" and modge podged scrap book paper in the bottom.  In retrospect, I probably should have painted the tray to match the table but I was WAY over it by this point. 


Picked up a couple of old coasters at the thrift store, painted them and added the same scrap book paper with the Modge Podge.  I glued felt to the bottoms as not to scratch the paint. 


And there you have it.  All done and I still have a thread of sanity left and all of my fingers.  Lessons learned:  Either stick to painting items that require no construction skills or go to Tech and take wood working classes or ask my carpenter husband to work with me until I pick up the skills I need.  Naturally, the first option would be much easier but that would be too boring for me.  I've always needed a challenge and this definitely did me for a while!!!! 


Sunday, January 15, 2012

Apothecary Jars and the curse of OCD

I've been having so much fun messing with this and that lately.  I've been all over the board!!!!  If a person could get inside my mind, I'm certain it would make them dizzy.  I probably need to take a few steps back from the World Wide Web.  There are so many ideas out there, well, it could drive this girl over the edge.  Not that I have all that far to go, mind you.  I have a "touch" of (actually full blow) OCD..  I get all these projects in my mind going and then the fact that they are unfinished haunts me.  The OCD makes me work very slowly because every detail must be precise.  Therefore, every piece I've bought and stored away calls my name.  Then there's the fact that my house looks like a cross between Hobby Lobby and a wood shop which is driving me insane.  You've got the obsessive....  which is the buying and creating and then the compulsive which can't tolerate disorganization.  It's a double edged sword people!!!  I'm working my way through it though!!  Believe it or not I've mellowed in my old age.  LOL!!!! 

When I walk into a thrift store, I can't stay focused on searching for just one category of items.  I see this and go  "oooooh!!!" and I see that and go "oooh!!!"  I really need to learn to talk to myself before entering the doors.  The conversation needs to go like this, "Okay girl, we're looking for furniture today!  Do not approach the glassware, picture frames or ANYTHING other than furniture".  Gotta work on that! 

BUT, I've been seeing all these pretty DIY apothecary jars on the Internet like these. 


And these


I really wanted to make some.  They are just TOO cute!!!!  So, in my thrifting travels, I was on the lookout for candle sticks that I could paint and then add empty jars with spray painted lids.  Much to my surprise, I stumbled upon some REAL apothecary jars.  You'd have thought I just hit the million dollar lottery!!!!  Then, my whole mindset had to change.  Searching, searching for candle holders to fit the jars.  Luck would have it that I have found the honey hole of thrift stores!  There are shelves of stuff packed so tightly that you are afraid if you move one item, the whole thing will come tumbling down!  (taking Pig Pen in there makes my hiney tight and sends shivers down my spine!!!)  Stuff has probably been there for 10....  20 years.  It's a "picking" experience not a thrifting experience!  That's one of the perks of living in a rural area with so many tiny towns nearby. 

So, after finding the jars, I lucked up and found these.


My stars must have been aligned perfectly that day!  The one in the back was a ceramic class creation by Dot circa 1967.  It was orange but I had already hit it with primer before I remembered to take the picture.  The other two were the EXACT same style but in two different paint finishes.  What are the chances of that?  Ideally, I would have liked all three to be different since the jars were all different but, hey, thrifters can't be choosers! 

I primed them and mixed up a concoction of chalk paint using plaster of paris, water, and Martha Stewart's Seaglass.  I painted them ,waxed them and glued the jars on.  And TA~DA! 


The second picture is more true to the actual color (a seafoam green).  My photography skills plainly suck!  But, I have to let that go!  Can't get obsessed with THAT too! 

Here's the kicker.  These apothecary jars and a little light house votive candle holder project I'm working on have sparked the idea of a bathroom makeover.  (big sigh).  Adding ANOTHER project to my scattered brain's agenda!!!! 

It's all good!!!  While I do drive myself crazy, the truth is I ALWAYS have.  No matter what I'm doing, whether it's designing a custom kitchen or painting a thrift store find.  I'm always my own worst critic and over analyzing every detail.  The beauty of my life today is, I CAN slow down to the pace that I'm comfortable with and start taking life in stride.  The "business politics" end is out of it and now it's all about the creating.  I still have alot of work to do in the "not driving myself crazy" department but atleast now it's just ME doing it! 
That's right folks!  I'm a little crazy but the first step is understanding and accepting your "issues" because we all have them.  Next step is finding your place in the World where your "issues" work for you rather than against you.  I've NEVER been more content!  I've been blessed with two guys who love me for who I am...  they always have.  I just had to learn to love and accept me too.   

Embrace and love who you are!! 


Sunday, January 8, 2012

Black Distressed Chest of Drawers and Bookcase

I'm on a roll!!!!!  Two posts in less that 24 hours.  I know you are grabbing your heart Fred Sanford style at the amazement of it all.  :-)

I recently re-vamped a couple of pieces for a friend.  This girl has an eye for decorating that is beyond description!  Her house is simply gorgeous so I was quite flattered that she asked me to paint a chest of drawers and bookcase for her little boy's room, which she is in the process of redecorating. 

Here's what they looked like before. 


The chest of drawers had been previously painted white and lived in her daughter's room.  The bookcase had a coat of gray primer when I picked it up.  Stephanie wanted them painted black and distressed.  Distressed is always best when living in a room with an 8 year old boy!!! 

So, I got to work.  First step was to strip the white paint off the chest.  I believe it had been painted with floor paint, and while durable, it had a texture that I wasn't digging. 


Kinda gross, don't ya' think?  Stripping paint has to be one of the messiest jobs there are but this stuff is a miracle in a can!!!!  After getting the old paint off, I sanded her down to get a nice smooth surface.  Then I applied "Gripper" primer and then flat black paint. 


Then some distressing along all the beautiful lines to make them really stand out. 


I used the same technique on the bookcase.  Because the two pieces were different wood species, the distressing didn't match and I DEFINITELY wasn't digging on that!!!!  So, I applied Cherry stain with a Qtip to all of the distressed areas on both pieces.  The last step was two coats of wipe-on Poly.  I LOVE that stuff!!!!!  It's easy as pie to apply and it gives a hand rubbed finish. 

I took them back to their home yesterday and Stephanie was THRILLED with the results which made my heart smile.  I'm always nervous when working on other's furniture but I was a little extra nervous on these because she has such beautiful taste.  So, when she was so happy with them, I wanted to do the happy dance right then and there!!! 

I'll leave you with before and afters side by side.  I have seen others post their pics this way and I loved it because I could truly appreciate the before and after.  SO, I was quite impressed with myself when I figured out how to do this!!   


Hope y'all have a wonderful Sunday!  We are having some beautiful weather again here in SC so I'm going to get busy today sanding several pieces.  Then, when the weather turns cold, I can pull something out and paint inside.  I'm getting smarter about this stuff!!!!!  :-)


Saturday, January 7, 2012

Chalk Paint Experiment = Facebook BLOW UP!

Yep, it's really me!  I have not fallen off the face of the Earth.  It's been a while since my last post but I have a tendency to get tied up over on my Facebook page.  I really enjoy the interaction and the amazing people that I've met!  It's SUCH a fun place to be!  I tend to get caught up and forget Blogland.  I'm going to do better though, I promise. 


Speaking of the Facebook page!  Things have really been hopin' over there.  I've had a nice steady stream of new friends since starting my page, a little over three months ago, and just recently did my first give away after reaching 200 likes.  I was tickled to death to reach 200!!!!!!  I just shipped the prize out two weeks ago to Final Touches Redesign.  Then, I posted this a couple of days ago and my page BLEW UP!!!  I'm talking about mind boggling numbers of people.  Take a peak.


This is what got people swarming over.  I was expecting swirls of smoke to come boiling out my screen!  I've had almost 30 new likes in less than 24 hours.  WHAT!?  GET OUT!!!!!  That's what I was saying this morning when I logged on.  Surely, this is a nice dream and I'm going to wake up in a few minutes.

Here's how it all came about.  You may remember that I wrote a post (forever ago) that I was going to experiment with homemade chalk paint.  I'm slow like a turtle....  it's just who I am.  Got that from my Daddy.  He never got in a hurry for anything but I loved that about him.  That was so much of his gentle, calm nature.  So, a gazillion days later, I actually got around to doing it.  I can't take ANY credit for the recipe.  2ndEssence is the one who developed the recipe I used and she was gracious enough to share it with others.  I'm so glad she did!  It's so stinkin' AWESOME!!!!!!  (I'll share it with you at the end of the post). 

I mixed it up, got out one of my little cheapo sponge brushes and got to painting.  I forgot to take a before picture of the frames but they were just your basic ugly gold frames.  After I painted them with the chalk paint, I then lightly dry brushed a couple of coats of white primer over the details.  I was fresh out of white paint (can you believe that?  Got every color under the sun but no white).  Time to take a trip to Lowes for more supplies!  To finish them up, I brushed on Minwax finishing paste (with my redneck waxing brush ~ a paint brush with a rubber band around the bristles).  Hey, I'm the Queen of improvising and doing things as cheaply cost effect as possible....  got that from my Daddy too.  LOL! 

Here are some close up shots. 


Who knew an experiment would cause such a stir???  I sure didn't!!!  But, I'm so grateful that I (little ole' me.... the Redneck Princess) was able to inspire others.  I don't think there's a better feeling in the whole World!  I've shared the recipe for this paint numerous times today and I'm going to share it again here (and 1 million times more to anyone who is interested!) 

1 1/2 cups Acrylic Latex paint (the one I used was Satin finish and I believe that's what 2ndEssence uses too with the exception of white.  When mixing white I believe she uses flat)
1/2 cup Plaster of Paris
1/2 cup warm water
First mix plaster of paris and water until there are no lumps and then mix in your paint. 

This paint gives a timeless, antique look that is very soft and subtle and its cheap cost effective.  I will definitely be using it again on certain things but will stick to my tried and true method on others.  I think variety is the spice of life!!!

In closing, I found this painting hanging on the wall of a thrift store and I COULD not leave it behind!  I had to save Miss Valda's art. 


I thought of how much love and time she put into this (just as I do with furniture) and I was determined she was going to get a better home.  While I didn't know how I would work this into my other things because it's not exactly my style, I so appreciated the skill and the colors.  Not to worry, I have two people who want to give Miss Valda a forever home.  Yay!!!!!  We love and value you Miss Valda wherever you are! 

Love & peace to all,